Wednesday, 26 March 2014

Chromecast versus the Apple TV

I got the Chromecast to compare with the Apple TV

For a while now I have been having some problems with my Apple TV. To be honest, I think the problems are more to do with the network and the way it is working within the house rather than the actual Apple TV itself. Quite often what I have to do is I have to go into the general settings and then into network and reset the automatic settings for ethernet on the Apple TV. This is usually because the video I wanted to watch has declined to play and after doing this little reset trick it usually works again. The Google Chromecast has just become available here in Spain at the same time as in other countries including the UK and I had been wanting to give it a try anyway. So I thought why not have a look. It worked out at €35 to buy it and at the same time I also bought a wireless, induction charger for my Nexus 7. Not really too happy with the charger at the moment, but then that is another story.

No instructions in the box for the Chromecast

Really, when you consider it there shouldn't need to be any instructions for the Chromecast from Google, as all you need to do is to go online and to find the information that you require. I fully approve of this because I don't see any reason why we should cut down any more trees just to put unnecessary pieces of paper in with our purchases. It didn't take me too long to initially get the thing working although there was a seemingly lengthy download that was required to update the device before I could even do anything at all with it.
The first thing that I wanted to do was to try and play some videos that I have on my Nexus 7 through the Chromecast onto the TV. It seemed to me that it would be something that the Chromecast should be able to do and I only found out later that I would be able to do that through an App called LocalCast. So today is the second day of having the Google Chromecast and when I got back home from work I decided to switch on the TV and see what I could organise. I had done a little bit more research and found that there are a number of applications that are made to work with Chromecast. These applications are for use on your desktop computer within your Chrome browser and also applications that work on your Android devices. I still haven't got around to trying them all out yet. The one that I have been having some success with so far is the Plex application and I have been running that on my desktop computer, an iMac. I have been able to watch some videos / movies from folders of my hard drive without any difficulty at all. I got a nice smooth play of the movie with no buffering problems and I was quite happy to have got it working.

Using the Plex media server

I still haven't fully got into understanding all of the things that Plex is able to do, but the main thing is that you download and install the Plex media server software. When you have this done you can set up your library of videos. It is not completely intuitive the way that it works. On the Nexus 7 there is also an application called Plex Remote and that is another one that I have not been able to make work as yet. It seems that the best thing for me to do is to work out these things one by one and gradually build up my knowledge of how all of this functions as a system.

Using the Chromecast to display photos and play music

I found an application for the Android platform called AllCast and with this I was able to go into my photos gallery, this time on my Samsung Galaxy S3 and to send these images to my TV. I was looking to see if I can find a way that I could select a number of these and have them do a slideshow going from picture to picture. I did get to see the pictures one by one but still I'm looking to find an application that allows me to do that slideshow thing with all of the photos within a folder. Using this same AllCast I was able to send music from the Galaxy S3 play on the television.

The verdict so far on Chromecast

I still have a lot of things that I need to work out and so this will be just the first article in a series of articles as I find out more on how it all works. I have managed to get videos, music and photographs showing up on my TV, so I can confirm that it does actually work. I haven't found the whole process completely intuitive and I am sure that there should be more applications developed that allow the use of Chromecast. I see that there is work being done at the moment as evidenced by a beta app giving functionality of complete mirroring of your desktop. That is something that you get with the Apple TV, that I found to be easy and worth having. I feel sure that Google will be looking to give us a similar set of facilities that we can use Chromecast for demonstrations and presentations.

Try one out - Why not?

Keep your eye out on this website for some more posts on how to get the best from Chromecast as I work out for myself what is possible and where there are some difficulties. For the price I think that the device is marvellous and I would recommend trying one out.

Wednesday, 22 January 2014

Customising the Mac

One of the things that I really like about the Mac is that there are so many little applications that you can buy or get for free which customise basic uses and procedures using the computer. It isn't that the standard set up of the Mac is anyway bad, it is just that all of us use a computer in different ways and therefore is ripe for personal customisation. I only have to look at the menu bar on my iMac to see that there are a lot of little extras I have added to my personal set up for Mac computing. Today I have been setting up a couple of extra applications to add more functionality and give me some extra ease of use.

Doing things with DropZone


I have added the application DropZone which I got in the latest Mac Heist bundle. This makes it very easy for me to take a file and do a number of things with it. I have set it up with Flickr and I can drag a picture file to the right side of my screen and the dropzones that I have configured will pop out. Dropping the file onto the Flickr dropzone will send that file off to the web. There are a number of other things that you can set up to do, such as moving or copying files to a specific folder. I will be also looking into other connections that I can make with this application. I see that it is very easy to use this for launching often used applications, if I move the mouse cursor to the right-hand side of the screen I get the option to pop out the circles.

Dealing with the Trickster


Trickster is an application which I had on my Mac before and I found it to be quite useful and today I set it up so that it starts automatically when I open up my Mac. I have only just reinstalled it since upgrading to Mavericks. I had found it useful before, but had forgotten about it and only remembered when I heard another blogger talking about it in a podcast recently. What this application does is to keep an eye on certain folders that you can specify and the files which appear in those folders. You can set the view so that it shows the list of files by date and this is very handy for a file that you were working on today or yesterday and you want to get back to it quickly without having to open up the Finder window. If there are a lot of files that you have been opening then you can filter down the files by using a search term.

Getting the Canary out of the cage

There is a developmental version of Google Chrome called Canary. I only just found out about it and decided to add it to my Mac because it gives me a menu bar icon giving me access to Google Now. What Google Now does is to look at what you are doing with your life and pops up info to your Android devices and now also the Mac. It gives you information sometimes before you know you even need it. I like to use Google Now to know when the next game is being played by Barcelona Football Club and it will also give me the scores after the games have been played. It gives me the local weather as well as information about birthdays of the people I am connected to on Google+. At the moment what it does is fairly simple, but it is something that is gradually getting better and offering more information. A good thing about this Canary version of Google Chrome is the fact that I can have it installed alongside the normal version of the application. I find that it suits me to have Google+ in the Canary version and to run my general web browsing in the other one.

More file finding with Houdahspot

There are times when you are trying to find a file and you can't remember the name of the file, but you can remember some of the words that you used within it. Houdahspot is an excellent application which gives you all sorts of super search facilities including a fuzzy search. You can combine various searches creatively to really specify exactly what it is you are looking for. There is also a menubar icon for this application called Blitz Search and this is a good way to get the Houdahspot application started and then further refine what it is you're looking for in the main window of the application.
All you have to do with Houdahspot is to fill in the details of what it is you are looking for in the what, where, exclude and limit sections of the application. Once you get used to howe this application works and you know how to make it look for things when ANY of the following is true or ALL of the following is true you will find that it is an extremely powerful searching tool for the Mac. Spotlight on steroids.

Launch Bar or Alfred


As I have been using it for some time, Alfred is my preferred application for using as a Mac Application launcher. This is also because it can do a lot of different things as well as launching applications. I sometimes use Alfred to do a quick calculation and I also have a few other extras programmed in also, but I only use those rarely. I was tempted this week to give LaunchBar a try, as it was also included in the Mac Heist bundle. I haven't added it yet, but there are many people that swear by it and I might be tempted to give it a try when I have a little bit of free time to spare.

Textexpander and DragonDictate

In the previous version of Mac OS X I was having to switch off Textexpander whenever I started to use DragonDictate, especially when I was using DragonDictate in other applications. There seemed to be some sort of bug which made it so that those two applications didn't work well together. Now that the dust has settled with Mavericks I find that I can forget about having to switch off Textexpander while I am using DragonDictate.
It really is very useful having an application that will fill in things like email addresses and complete web addresses with a couple of key taps. For example, I can put in the whole of my email address by typing in ,,w. This is very handy as I find I often have to enter an email address into a web form and by using Textexpander I know that I will always enter it correctly without any typos.
Of course, all of this article has been written using DragonDictate while I have my feet up on the desk and I am leaning back in my chair in a very relaxed mode.

Sunday, 5 January 2014

Importing AVCHD video from a Sony NEX-6 for Final Cut Pro X

My previous camera the Canon 600D gave me the video files as individual files that could be grabbed from the correct folder off the camera and had dragged straight in to be used and edited in Final Cut Pro X. With the Sony NEX-6 there is a folder which looks like a file that is called AVCHD and as you shoot more video the clips get added to that single file. It seems like it would be a more difficult thing to do, to get video from the camera into Final Cut Pro X, but it is not really much more difficult than before. In this video I show you three different ways of getting the video clips from the AVCHD file into your video editing software.

Import AVCHD video into Final Cut Pro X

The simplest way to do this process is to use the keyboard shortcut Command I to bring up the import window. You can then choose the AVCHD file which you might do directly from the camera or you might have copied the file from the camera to your hard drive first. I have found that it isn't any slower to do this on the camera and when you are ready to delete the file it is better to do it from the camera menu system anyway.
I found that the database of the movies in the camera can get a bit messed up if you delete from the computer rather than the camera. I also know that sometimes with a SD card I can be a could idea to format it using the camera software from time to time also. The size of the file is reasonable using this method and for most people it will be the way to go for now.
You will see within the import window all of the video clips that you have on your camera and you can choose to bring in just one of them, some of them or all of them. In the video I selected just one of the video clips and it doesn't take long for the video to be ingested into the Final Cut Pro video editing system.

Using specialised software to import AVCHD into Final Cut Pro X

I found on the Mac App Store some free software that is actually called free AVCHD to MOV. The application is very easy to use and it also has a number of presets to make it even easier. Drag-and-drop the AVCHD file into the application window and it will then show you the video clips with the details, so that you can choose which ones you want. In the video I bring in the same file that I imported in directly so that we can compare the differences between the import methods.
The conversion that I chose to use with this software is a preset specifically for Final Cut Pro X or other high end video editing applications. This is the Apple ProRes codec 422 and there is much more information contained within the resulting file. Because there is more information contained within, the size of file is therefore rather large, in fact you might say it is completely massive, enormous or huge. In this case the file which started out as about 140 MB grew to very nearly 2 GB in size. For many of us there is no advantage to using a file of this size and in fact it slows us down because of having to do the conversion in the first place. It could even be that you need to have a larger amount of memory on your computer to be able to work with these files efficiently. Certainly, for me using these type of converted files is rather like using a sledgehammer to crack a nut.

Using QuickTime to convert from AVCHD to h.264

There is talk that the QuickTime format is on the way out and to be superseded by other video formats, but I think it will take some time before that happens completely. You can use the application QuickTime To convert your video from AVCHD to individual video clips that you can use and edit in Final Cut Pro X. You only have to go to the file menu and click on open and choose the AVCHD file. Up pops a window which will give you the option to choose whichever of the files you want to convert or open.
So you have the video clip open in QuickTime and you can do one of two things. First of all you could use the File And Save menu option to save the file out in the correct format or what you can do is to use the share option on the menus. There you have a number of preset choices and the one that I used to convert the video clips was the 1080p which converts it to the h.264 codec. It is a simple process to get the files into the Final Cut Pro X application either using the import window or just by doing a drag and drop.

Thursday, 26 December 2013

Best way to add movies to iTunes

A better way to add movies to iTunes

Add movies to iTunesIf you have a TV show that you have recorded and you want to watch at a later stage using iTunes, one of the problems is that when you add it to iTunes it goes into Home Movies. When it is in Home Movies, what you have to do then is to go into the meta data through Get Info, go to the video tab to put in the details for the television show such as number for the series and the number for the episode. Then you need to go to the options tab and in the options tab you inform iTunes that it is a television show where it says Media Kind. Sometimes you also have to put a check box room where it says remember playback position and also for skip when shuffling. Only then do you have your TV show in the correct place ready to you to watch. Having to do this I find is tedious and annoying and I am delighted to say that I found a better way of doing this using an application called iVI Lite.

Using iVI Lite to get movies into iTunes

With this application all you have to do is to drag the files that you want to put into iTunes into the main window. The application goes off to the internets and gathers information about the file that you have put in there. Unless there is any Meta data within the file it helps to give the application iVI Lite some information to help it get what it needs. Where I would use this program is to get a TV programme I have downloaded through the BBC iPlayer that I want to watch on the television rather than on my computer. It could be possible to send my computer screen to the Apple TV and I would do that if I was in a hurry, but I find that it messes things about too much, with my computer and I would rather put it into iTunes.

IVI Lite Edition and File Details Circlecount How to SD for Apple Devices m4v and Movies

iVI Lite seems to be quite clever in that it will not only find the details for the series and for the episode numbers, but it will also add a title if it finds it and often other information. I don't know where it gets its information from but I have had great success with this so far. If you have more than one file in the application you can click on the button to Convert All or use the button Convert if there is only one movie to work with. Another little window opens up and after a very short wait it will convert the file and then send it directly into iTunes in the proper place. No more fiddling about with the meta-data in iTunes to let it know that it is a TV show and not a movie. From within iVI Lite there are buttons available let you say what type of video it is. So obviously if it is a movie it goes off and looks in the proper places to get the information which by the way also includes artwork.

iVI Lite - Job done all sorted

This is the light version of the application and so far I haven't found any need for getting the paid for version. I think that the application iVI Lite is full featured except for the number of types of files that you can convert to. The free version of this application works great and I can highly recommend it as it works quickly and accurately. It is much better than you doing it manually and then having to go and find out where iTunes has put your movie.

Tuesday, 3 December 2013

How to get your photos into Aperture

Importing photos into Aperture

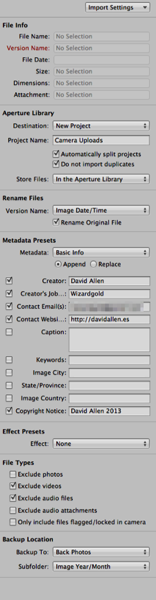
The easiest thing is to put your SD card into the slot and Aperture pops up with your photos all checked and all you need to do is hit the Import button and all the files are sucked into Aperture. There again you could use some of the import settings and save yourself some time and effort later. In the video I show you how you can set a number of things into motion, including backing up the photos as they are imported, change the files names, add keywords, put in copyright info and even alter the versions of the files with effects presets.

Aperture

Look to the right of the screen

You will see all of the option in a drop down at the top of the right side bar, it is called Import Settings. You can the Aperture app where you want to put the files by choosing a new project and naming it or choosing a project already present. Tick the box if you don't want duplicates to be imported and if you want to see the photos split into projects automatically. The photos get split by date.

I like to name files based on the syntax of Year-Month-day_hour-min-sec and this means I will always have unique names for the files. If I had two cameras taking picture at exactly the same time (which is not going to happen often) the application will add a number to the end of the filename to make it unique.

Metadata in photos

The camera will put some info in the file that is your photo. If you look you will see that the camera make and model is recorded and other details such as the lens and the settings in use for that image. When you import the photographs, why not add you name, telephone number, contact email, and your web site url. Then is someone steals your photo you will have details that prove the photo is yours and the thief can't say I didn't know how to contact you to be able to offer to pay for the use of the image.

In the previous video we looked at adding keywords to photos and I think it is better to add keywords using the HUD for that in Aperture. You can be sure of the spellings and that you will not have a confusion of having similar words that would make things harder for searching later.

Back ups of photos automatically

As the photos are put in Aperture the import settings can take care of making a back up of those photos. Set up this default setting once and you will have a level of back up in place that will keep your files safe. It is worth doing so that the photos also get sent to another disk too, or to an online storage facility.

Not just your photos in Aperture

You can add movies and also audiofiles into Aperture and this makes the app even more useful, especiallly if you are guy that works with various types of media. Good to have all your stuff looked after in one place, especially as you can use Aperture to help you find files based on the keywords, file type, length of file and with loads of terms in the metadata. Aperture is such a useful application for photographers of all types and level of professionalism.

Sunday, 24 November 2013

Finding your stuff - Old-style versus new

In days of old when knights were bold and personal computers had just been invented it was very difficult to find your files into which your thoughts had just been vented so you ended up making the files live in folder after nested sub folder but now there is a new way of doing it and you throw them all in one big bucket with tags, meta data, intelligent search you can get at all your stuff without just being lucky.

Big bucket or folders inside folders?

So there you go, that's the way it was and it took a while to get away from the bad old DOS days when you had to tidy away your computer files just the same as if they were inside paper folders in grey metal cabinets. The more senior members of our world still want to work that way and still have this belief that things are more organised and much better when everything is tidied away inside of those nested folders. Some go for organising by year, month and day with more separation inside of that based on type of file. Some go by project and then do the types of file inside that. I think that doing that these days is just plain silly and hides files more than it makes them accessible. I am a convert to the single big bucket and the use of fantastic search tools and smart searches to get my digital stuff.To a certain extent we are still in a transition period moving on towards just throwing it into one big amorphous glop inside a single folder on the computer and letting search do all of the work for us, but things are moving on.

There are some computer systems and applications setup to put their documents into specific places and keep them away from all of the other dirty files and folders from other applications. Now that we have intelligent searching on computers where the tools that you can use know documents by kind or type, know the data that is contained within the file, has extra metadata to use in some types of document, as well is even possible to use fuzzy logic when searching, then why give ourselves the hassle of having to put certain types of files in certain places.

You could drive yourself crazy looking for stuff if you have organised yourself by date and you can't remember what month or year it was when you created that spreadsheet, text file or whatever sort of document. You also could end up with subfolders within folders that have the same name. Such as a folder called spreadsheets each time you work with a New Year when you have opted for a folder organisation that has a folder for every year and divided again into months and so on. Mind you, you can use intelligent search of such an organisation, but it is a waste of time sorting it like that in the first place.

What about if you organise by project and then you want to find all Keynote presentations and each one is in a different place on the hard drive. Fortunately you can have a mix and put files where they make sense for you and then use a tool like Spotlight in Finder or HoudahSpot which does the same, but a whole lot better. Or you could use Evernote and manually bring files of different types into Notebooks or has links to your stuff all in one place. Then with Mavericks we have Mavericks tags, which are not the same as keywords or open meta tags as used in files saved before Mavericks.

It's all a little bit mixed up

So the way that it kind of works at the moment is that there are folders created by applications and by the system such as one for music, another for pictures, a movies folder and another for documents. If you don't create many files and you know the type of file at your looking for then it can be fairly easy just to go by name of the movie or audio file and just looking inside a particular folder. This doesn't work so well if you have hundreds or even thousands of files or a particular type and you only have a vague recollection of what the file was called. So you need to get into using the better search tools with Boolean operators and smart searches that can look in whatever places you tell the computer to look.

It is a good idea to have all of your document files that you create yourself separated from the computer system files. So that when you are doing a backup or you are moving files from a one computer to another it is easy to know that you have all of the important data taken care or. You can tell the backup application or the application you're using for copying just to look in that one place, the big file bucket with everything in it. For example, with my photographs I know that all of my photographs are in the application Aperture. The files are stored within one single file/folder and I make sure that the files are not scattered around the hard drive and referenced into the application. If I need to do a backup everything is in one place and it is all really very easy.

Wednesday, 23 October 2013

Upgrading to Mavericks for free

Mavericks for free - Yippee!

Of course all of the Apple fans are so very happy with the updates that Apple announced yesterday at the October Apple event, but one of them stands out from the rest. The fact that Apple have made this major update to the operating system, OS X Mavericks free, surprised just about everybody. It would be nice to think that Apple have done this to give something back to the Kool-Aid drinking, Apple loving Mac community. There is a possibility that this is the case, but we do have to remember that Apple is a multibillion dollar company, that quite possibly has business and marketing motives for giving us Mavericks for free. This may seem cynical, but we should remember that this is the way the world really works. Whatever the reasons are for giving away the Mavericks for free, there is no reason why we shouldn't do our happy dance anyway.

Mavericks for free

Mavericks a big download

With the updates weighing in at over 5 GB it is taking a very long time for the update to download over my slow Internet. I started the download at about 11 PM last night, so that is about 14 hours ago and I still have more than 1 GB left to download. No problem, as during that time I will be able to do all of the necessary backups and setup work to be ready to do the Mavericks upgrade.

A completely clean install of Mavericks

Not long ago I added an SSD to my iMac and I did an unclean install onto that drive. I decided that seeing as Mavericks was coming quite soon it would be a good opportunity to set it up right at that time. No point in me doing the job twice and besides I wanted to do a quick job while I had the new SSD drive in my hot sticky fingers. The plan now is to create an SD card installation drive and to wipe clean both the SSD drive and the data drive on the iMac. This way I will have a completely virgin installation of the operating system on the SSD and I will be sure that I don't have any old and unwanted bits and pieces on the old hard drive. I know that this needs to be done because the booting into the SSD drive over Thunderbolt should be extremely fast and at the moment it isn't.

SuperDuper or Carbon Copy Cloner

SuperDuper

The first part of the job is the most important and that is to do bootable backups of all of my system and data drives. I will be using Superduper or possibly Carbon Copy Cloner to do this. Then I will go through the applications folder and get a list of all of the applications that I have installed. I plan to go through this list of applications one by one, first of all marking the applications which I can just grab from the Mac App Store. Then I will mark applications that are just to be forgotten about and not to be reinstalled. Then I will go through the rest of the applications which will be applications needing up-to-date software licenses and serial numbers. I will make sure that I have all of my software serial numbers in one place and I will also see that I can download any software installers that I need. I was pleased to see that GPGMail Plugin has been updated for Mavericks.

It is going to take a couple of days probably to get everything just the way I like it. But it is a job that is going to be worth doing correctly so that it will last a long time before I need to do a rework of the operating system on my iMac. When I have the iMac job finished off, the next thing to tackle will be my wife's computer, a MacBook Pro. I am thinking that I will buy an SSD drive to install in her computer so that with the new drive and new operating system it should fairly fly along for her. I'm sure she will be delighted and she can repay me in kind.