Monday, 29 September 2014

Android to iOS and Apple Only

Have to learn about Touch ID on iOS

Touch ID CHiaroscuro

Now that I'm moving to the iPhone 6 I am going to have to find out how to use the Touch ID with my finger prints. Last year when the iPhone 5S came out everybody was raving about how good is and there were plenty of tutorials on how to use it for the best. With all of the new things that have been introduced with IOS 8 there is not so much new information available. So people like myself who are moving up from a phone that doesn't have Touch ID will have to go back to the information from last year to get properly informed.

Bye Bye Galaxy S3

The phone that I have been using for the last 16 months is the Samsung Galaxy S3. When I first got it I was very pleased with the phone and delighted that it could do much more than I could with the iPhone 4. I particularly liked that I was able to use the Swype keyboard and I also used the SwiftKey keyboard for a short while. I also liked the way that I could arrange icons on the home screens of the device. I had dictation available to me on the phone which was great as the iPhone 4 was pre-Siri. Being a big user of DragonDictate on my Mac I also wanted to have the same sort of facilities on my mobile devices. With the introduction of IOS 8 Apple have caught up with some of the things that took me over to the dark side.

Why can't I upgrade to the latest OS?

One of the biggest problems of the Android phones are the difficulties of upgrading to the latest operating system software. There was nothing coming down the tubes from the phone carriers and it really isn't great to have to resort to rooting and things like CyanogenMod. It is a lot of messing around and a complete pain in the arts. Is it any wonder I am going back to Apple Only and no more Android. There are a lot of good applications for the Android phones, but it seems to me that to a certain extent it is a second class experience compared to what is available on iOS. I am a big user of the application DayOne for journalling and that is only available on the Mac and iOS. The application that I like to use for inputting text is called Drafts and there is nothing like it on Android. I can put text into Drafts and I can then send it to various places at a later stage. This makes the application very versatile and the best notetaking application out there. I could start something that would be a couple of sentences and just right for sending off to Twitter, add some more to it and then it becomes a post for Facebook. The application Drafts is also great for longer pieces of work where I can write in markdown. I can export out of the application and put it into Blogsy the blogging application for iOS and that is just a brilliant workflow.

Apple iOS apps are better

Another application that I want to make more use of and is only available on Apple products is OmniFocus. With the books that I am writing I need to be completely organised and I can set each of these books up as a project. There are a huge number of ways to organise things from the project angle and also from the time angle within OmniFocus. I can have it so that the application only shows me the next thing that is due. I don't get overwhelmed by all of the jobs that are lining up in the queue waiting for me. I also use another application for lists called Clear. Clear is great for making quick and dirty lists when I don't want to jump into OmniFocus. Blogging from the iPad is far better than blogging from Android.

Wednesday, 30 July 2014

The sunsetting of Aperture on the Mac

What! No more Aperture on the Mac?

Of course, as soon as I nearly have this book ready to go out with the videos that I have made showing you how to use Aperture to organise your photos and to do various things such as enhancing by adding effects, then Apple comes out with the news that they are going to stop working on Aperture. This is called sunsetting of an application and it seems to happen more often than you would realise. So now they are going to bring out another application instead which will take over from both aperture and also from iPhoto. Even though Apple is a huge company with massive resources, it still makes sense for them to just have one application which will do the job for everybody than it is to have two apps at different ends of the market. The big problem with this announcement is that the photographic pros that use Aperture believe that they should get special attention and better capabilities of an application for dealing with photos. The pros have already jumped to the conclusion that Apple is going to ditch them in favour of a wider market of ordinary to enthusiast users that only need a bare minimum of facilities to deal with Their photos. There have been quite a number of articles written by the photographers claiming that Apple have stabbed them in the back with this move, and due to that they will just will head off to the main competition for Aperture which is Lightroom. Myself, on the other hand, I am working on the notion that the application Photos will be more than good enough for the enthusiasts and for the professionals. There are one or two reasons why you might want to be optimistic about this being the ultimate outcome for the applications you need to deal with photographs on your Mac.

What does the future hold for photos on Apple products

Well in the first instance we can say “Who knows!” Because until the application photos actually arrives on our desktop we have no idea what it’s going to offer us. There is the possibility based upon what has happened with previous similar upgrades of software and I’m thinking about Final Cut Pro here, that not all of the features that we would like, will be present on day one. The software will be written from the ground up and will be easy to use with some decent features and a promise of a lot more to come. Final Cut Pro X was like this and has just got better and better. Final Cut is easy for everybody to use, professional and beginners alike and yet still having excellent capabilities for dealing with the requirements of professional video editors. I could well imagine that it will be similar when Photos takes over from iPhoto and from Aperture. I expect that there will be some things that we do in Aperture now that will just be easier to do in Photos. If it is easier then it is also better, right?

Will all the photos have to go to iCloud?

It is going to be a good thing that we have one application that will span across IOS and also the Mac and is also linked to the cloud. The thing about linking to the cloud is that some people are making assumptions that if you put a photo into the application Photos then you will have to store that photo in the cloud also. What this would mean for people with large photo libraries is a large number of megabytes of data having to be uploaded and also then downloaded when you want to use any of these photos. Not all of us have download speeds or even upload speeds that are good enough to make this viable. I would like to think that it will be possible to choose which of our photos will get uploaded to the cloud so that if you do have big libraries of photos, you don’t have to put all of them up there. There is also the consideration of cost of the online storage. There will be a certain amount of online storage available for free with iCloud. It seems that the cost of getting extra iCloud storage is going to be fairly reasonable. Even so, it is still going to make a lot of sense to be able to choose which of your photos you will have stored online especially when you are running a very large photo library. The amount that we will get for free will be 5 GB which for many people will be plenty. Then some people will want to go with the 20 GB option and that is only $.99 a month or if you want to will look at it in terms of an annual payment it is $11.88. Even going for the next option which will boosted up to 200 GB it is only going to cost $3.99 per month and that is a huge amount of storage space.

What can we expect from Photos app from Apple

One of the main things that you will want to do with your photos is to be able to organise them in such a way as you can find them again easily. With the new photos app from Apple there will be some default collections of photos based upon when they were taken. So there will be a view which will start off by looking at photos separated by the year there were taken. It seems we will get some smart suggestions for creating albums based on locations, times and scenes that are similar. As you would expect from good photo editors these days, the edits that we can make with the photos will be nondestructive. Any changes that are made to a photo, also get sent off to the cloud and so the changes can be seen when you look for that photo on other Apple devices connected to that account.
Converting to Black and white in APerture
Searching for photos should be easier and it looks like there will be smart suggestions given to us, but for really good searching some of it will be dependent upon us using the tagging features and the naming of photos. The location of photos is another good way to search, but for that you will have to have done some geolocation of your photos in camera or using an application like HoudahGeo to do it after the fact.
In the demonstration of the Photos application at the keynote event at WWDC, they showed smart adjustments being available, which is all very good so long as you can also do your own manual fine adjustments. Not only that, but it will also have to be easy to get in there and make these changes and not be hampered by the easy-to-use smart adjustments that are there for the casual Apple photographer using the Photos app.

I feel optimistic towards the new Photos app from Apple

It is true that there have been a number of enthusiasts and professional photographers that have been running around like Chicken Little, thinking that the sky is falling upon them. There is a chance that they could be right, but I would like to think that Apple will give us all of the best things that we like to use in the Aperture and add the ease-of-use that they are famous for giving us to use on Mac OS X and in iOS. They have already said that on iOS it is going to be possible to use features available in other applications such as waterlogged as if we were still within the Photos application and I would expect this to also be the case when using the photos app on the Mac.


So while it is a bit of a pain that Apple have decided to sunset the Aperture application, it will still be available for people to use for another year if not two years. I do think it is strange that Apple have not decided to make the Aperture application free from now on. It is still available to buy from the App Store and I don’t think that is really the right thing to do. Most people making the decision to buy Aperture at the moment will most probably know about the impending demise of Aperture and will not get caught. Of course, there will be new tutorials by Wizardgold on the YouTube channel and also new tutorials that are specifically just connected to this book. So that will be something to look out for when I update this book and make it available to anybody that has bought it already.

Wednesday, 26 March 2014

Chromecast versus the Apple TV

I got the Chromecast to compare with the Apple TV

For a while now I have been having some problems with my Apple TV. To be honest, I think the problems are more to do with the network and the way it is working within the house rather than the actual Apple TV itself. Quite often what I have to do is I have to go into the general settings and then into network and reset the automatic settings for ethernet on the Apple TV. This is usually because the video I wanted to watch has declined to play and after doing this little reset trick it usually works again. The Google Chromecast has just become available here in Spain at the same time as in other countries including the UK and I had been wanting to give it a try anyway. So I thought why not have a look. It worked out at €35 to buy it and at the same time I also bought a wireless, induction charger for my Nexus 7. Not really too happy with the charger at the moment, but then that is another story.

No instructions in the box for the Chromecast

Really, when you consider it there shouldn't need to be any instructions for the Chromecast from Google, as all you need to do is to go online and to find the information that you require. I fully approve of this because I don't see any reason why we should cut down any more trees just to put unnecessary pieces of paper in with our purchases. It didn't take me too long to initially get the thing working although there was a seemingly lengthy download that was required to update the device before I could even do anything at all with it.
The first thing that I wanted to do was to try and play some videos that I have on my Nexus 7 through the Chromecast onto the TV. It seemed to me that it would be something that the Chromecast should be able to do and I only found out later that I would be able to do that through an App called LocalCast. So today is the second day of having the Google Chromecast and when I got back home from work I decided to switch on the TV and see what I could organise. I had done a little bit more research and found that there are a number of applications that are made to work with Chromecast. These applications are for use on your desktop computer within your Chrome browser and also applications that work on your Android devices. I still haven't got around to trying them all out yet. The one that I have been having some success with so far is the Plex application and I have been running that on my desktop computer, an iMac. I have been able to watch some videos / movies from folders of my hard drive without any difficulty at all. I got a nice smooth play of the movie with no buffering problems and I was quite happy to have got it working.

Using the Plex media server

I still haven't fully got into understanding all of the things that Plex is able to do, but the main thing is that you download and install the Plex media server software. When you have this done you can set up your library of videos. It is not completely intuitive the way that it works. On the Nexus 7 there is also an application called Plex Remote and that is another one that I have not been able to make work as yet. It seems that the best thing for me to do is to work out these things one by one and gradually build up my knowledge of how all of this functions as a system.

Using the Chromecast to display photos and play music

I found an application for the Android platform called AllCast and with this I was able to go into my photos gallery, this time on my Samsung Galaxy S3 and to send these images to my TV. I was looking to see if I can find a way that I could select a number of these and have them do a slideshow going from picture to picture. I did get to see the pictures one by one but still I'm looking to find an application that allows me to do that slideshow thing with all of the photos within a folder. Using this same AllCast I was able to send music from the Galaxy S3 play on the television.

The verdict so far on Chromecast

I still have a lot of things that I need to work out and so this will be just the first article in a series of articles as I find out more on how it all works. I have managed to get videos, music and photographs showing up on my TV, so I can confirm that it does actually work. I haven't found the whole process completely intuitive and I am sure that there should be more applications developed that allow the use of Chromecast. I see that there is work being done at the moment as evidenced by a beta app giving functionality of complete mirroring of your desktop. That is something that you get with the Apple TV, that I found to be easy and worth having. I feel sure that Google will be looking to give us a similar set of facilities that we can use Chromecast for demonstrations and presentations.

Try one out - Why not?

Keep your eye out on this website for some more posts on how to get the best from Chromecast as I work out for myself what is possible and where there are some difficulties. For the price I think that the device is marvellous and I would recommend trying one out.

Wednesday, 22 January 2014

Customising the Mac

One of the things that I really like about the Mac is that there are so many little applications that you can buy or get for free which customise basic uses and procedures using the computer. It isn't that the standard set up of the Mac is anyway bad, it is just that all of us use a computer in different ways and therefore is ripe for personal customisation. I only have to look at the menu bar on my iMac to see that there are a lot of little extras I have added to my personal set up for Mac computing. Today I have been setting up a couple of extra applications to add more functionality and give me some extra ease of use.

Doing things with DropZone


I have added the application DropZone which I got in the latest Mac Heist bundle. This makes it very easy for me to take a file and do a number of things with it. I have set it up with Flickr and I can drag a picture file to the right side of my screen and the dropzones that I have configured will pop out. Dropping the file onto the Flickr dropzone will send that file off to the web. There are a number of other things that you can set up to do, such as moving or copying files to a specific folder. I will be also looking into other connections that I can make with this application. I see that it is very easy to use this for launching often used applications, if I move the mouse cursor to the right-hand side of the screen I get the option to pop out the circles.

Dealing with the Trickster


Trickster is an application which I had on my Mac before and I found it to be quite useful and today I set it up so that it starts automatically when I open up my Mac. I have only just reinstalled it since upgrading to Mavericks. I had found it useful before, but had forgotten about it and only remembered when I heard another blogger talking about it in a podcast recently. What this application does is to keep an eye on certain folders that you can specify and the files which appear in those folders. You can set the view so that it shows the list of files by date and this is very handy for a file that you were working on today or yesterday and you want to get back to it quickly without having to open up the Finder window. If there are a lot of files that you have been opening then you can filter down the files by using a search term.

Getting the Canary out of the cage

There is a developmental version of Google Chrome called Canary. I only just found out about it and decided to add it to my Mac because it gives me a menu bar icon giving me access to Google Now. What Google Now does is to look at what you are doing with your life and pops up info to your Android devices and now also the Mac. It gives you information sometimes before you know you even need it. I like to use Google Now to know when the next game is being played by Barcelona Football Club and it will also give me the scores after the games have been played. It gives me the local weather as well as information about birthdays of the people I am connected to on Google+. At the moment what it does is fairly simple, but it is something that is gradually getting better and offering more information. A good thing about this Canary version of Google Chrome is the fact that I can have it installed alongside the normal version of the application. I find that it suits me to have Google+ in the Canary version and to run my general web browsing in the other one.

More file finding with Houdahspot

There are times when you are trying to find a file and you can't remember the name of the file, but you can remember some of the words that you used within it. Houdahspot is an excellent application which gives you all sorts of super search facilities including a fuzzy search. You can combine various searches creatively to really specify exactly what it is you are looking for. There is also a menubar icon for this application called Blitz Search and this is a good way to get the Houdahspot application started and then further refine what it is you're looking for in the main window of the application.
All you have to do with Houdahspot is to fill in the details of what it is you are looking for in the what, where, exclude and limit sections of the application. Once you get used to howe this application works and you know how to make it look for things when ANY of the following is true or ALL of the following is true you will find that it is an extremely powerful searching tool for the Mac. Spotlight on steroids.

Launch Bar or Alfred


As I have been using it for some time, Alfred is my preferred application for using as a Mac Application launcher. This is also because it can do a lot of different things as well as launching applications. I sometimes use Alfred to do a quick calculation and I also have a few other extras programmed in also, but I only use those rarely. I was tempted this week to give LaunchBar a try, as it was also included in the Mac Heist bundle. I haven't added it yet, but there are many people that swear by it and I might be tempted to give it a try when I have a little bit of free time to spare.

Textexpander and DragonDictate

In the previous version of Mac OS X I was having to switch off Textexpander whenever I started to use DragonDictate, especially when I was using DragonDictate in other applications. There seemed to be some sort of bug which made it so that those two applications didn't work well together. Now that the dust has settled with Mavericks I find that I can forget about having to switch off Textexpander while I am using DragonDictate.
It really is very useful having an application that will fill in things like email addresses and complete web addresses with a couple of key taps. For example, I can put in the whole of my email address by typing in ,,w. This is very handy as I find I often have to enter an email address into a web form and by using Textexpander I know that I will always enter it correctly without any typos.
Of course, all of this article has been written using DragonDictate while I have my feet up on the desk and I am leaning back in my chair in a very relaxed mode.

Sunday, 5 January 2014

Importing AVCHD video from a Sony NEX-6 for Final Cut Pro X

My previous camera the Canon 600D gave me the video files as individual files that could be grabbed from the correct folder off the camera and had dragged straight in to be used and edited in Final Cut Pro X. With the Sony NEX-6 there is a folder which looks like a file that is called AVCHD and as you shoot more video the clips get added to that single file. It seems like it would be a more difficult thing to do, to get video from the camera into Final Cut Pro X, but it is not really much more difficult than before. In this video I show you three different ways of getting the video clips from the AVCHD file into your video editing software.

Import AVCHD video into Final Cut Pro X

The simplest way to do this process is to use the keyboard shortcut Command I to bring up the import window. You can then choose the AVCHD file which you might do directly from the camera or you might have copied the file from the camera to your hard drive first. I have found that it isn't any slower to do this on the camera and when you are ready to delete the file it is better to do it from the camera menu system anyway.
I found that the database of the movies in the camera can get a bit messed up if you delete from the computer rather than the camera. I also know that sometimes with a SD card I can be a could idea to format it using the camera software from time to time also. The size of the file is reasonable using this method and for most people it will be the way to go for now.
You will see within the import window all of the video clips that you have on your camera and you can choose to bring in just one of them, some of them or all of them. In the video I selected just one of the video clips and it doesn't take long for the video to be ingested into the Final Cut Pro video editing system.

Using specialised software to import AVCHD into Final Cut Pro X

I found on the Mac App Store some free software that is actually called free AVCHD to MOV. The application is very easy to use and it also has a number of presets to make it even easier. Drag-and-drop the AVCHD file into the application window and it will then show you the video clips with the details, so that you can choose which ones you want. In the video I bring in the same file that I imported in directly so that we can compare the differences between the import methods.
The conversion that I chose to use with this software is a preset specifically for Final Cut Pro X or other high end video editing applications. This is the Apple ProRes codec 422 and there is much more information contained within the resulting file. Because there is more information contained within, the size of file is therefore rather large, in fact you might say it is completely massive, enormous or huge. In this case the file which started out as about 140 MB grew to very nearly 2 GB in size. For many of us there is no advantage to using a file of this size and in fact it slows us down because of having to do the conversion in the first place. It could even be that you need to have a larger amount of memory on your computer to be able to work with these files efficiently. Certainly, for me using these type of converted files is rather like using a sledgehammer to crack a nut.

Using QuickTime to convert from AVCHD to h.264

There is talk that the QuickTime format is on the way out and to be superseded by other video formats, but I think it will take some time before that happens completely. You can use the application QuickTime To convert your video from AVCHD to individual video clips that you can use and edit in Final Cut Pro X. You only have to go to the file menu and click on open and choose the AVCHD file. Up pops a window which will give you the option to choose whichever of the files you want to convert or open.
So you have the video clip open in QuickTime and you can do one of two things. First of all you could use the File And Save menu option to save the file out in the correct format or what you can do is to use the share option on the menus. There you have a number of preset choices and the one that I used to convert the video clips was the 1080p which converts it to the h.264 codec. It is a simple process to get the files into the Final Cut Pro X application either using the import window or just by doing a drag and drop.

Thursday, 26 December 2013

Best way to add movies to iTunes

A better way to add movies to iTunes

Add movies to iTunesIf you have a TV show that you have recorded and you want to watch at a later stage using iTunes, one of the problems is that when you add it to iTunes it goes into Home Movies. When it is in Home Movies, what you have to do then is to go into the meta data through Get Info, go to the video tab to put in the details for the television show such as number for the series and the number for the episode. Then you need to go to the options tab and in the options tab you inform iTunes that it is a television show where it says Media Kind. Sometimes you also have to put a check box room where it says remember playback position and also for skip when shuffling. Only then do you have your TV show in the correct place ready to you to watch. Having to do this I find is tedious and annoying and I am delighted to say that I found a better way of doing this using an application called iVI Lite.

Using iVI Lite to get movies into iTunes

With this application all you have to do is to drag the files that you want to put into iTunes into the main window. The application goes off to the internets and gathers information about the file that you have put in there. Unless there is any Meta data within the file it helps to give the application iVI Lite some information to help it get what it needs. Where I would use this program is to get a TV programme I have downloaded through the BBC iPlayer that I want to watch on the television rather than on my computer. It could be possible to send my computer screen to the Apple TV and I would do that if I was in a hurry, but I find that it messes things about too much, with my computer and I would rather put it into iTunes.

IVI Lite Edition and File Details Circlecount How to SD for Apple Devices m4v and Movies

iVI Lite seems to be quite clever in that it will not only find the details for the series and for the episode numbers, but it will also add a title if it finds it and often other information. I don't know where it gets its information from but I have had great success with this so far. If you have more than one file in the application you can click on the button to Convert All or use the button Convert if there is only one movie to work with. Another little window opens up and after a very short wait it will convert the file and then send it directly into iTunes in the proper place. No more fiddling about with the meta-data in iTunes to let it know that it is a TV show and not a movie. From within iVI Lite there are buttons available let you say what type of video it is. So obviously if it is a movie it goes off and looks in the proper places to get the information which by the way also includes artwork.

iVI Lite - Job done all sorted

This is the light version of the application and so far I haven't found any need for getting the paid for version. I think that the application iVI Lite is full featured except for the number of types of files that you can convert to. The free version of this application works great and I can highly recommend it as it works quickly and accurately. It is much better than you doing it manually and then having to go and find out where iTunes has put your movie.

Tuesday, 3 December 2013

How to get your photos into Aperture

Importing photos into Aperture

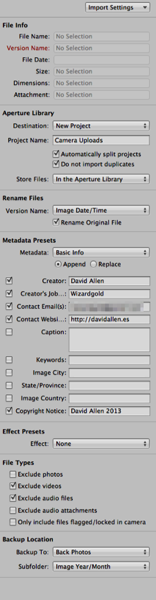
The easiest thing is to put your SD card into the slot and Aperture pops up with your photos all checked and all you need to do is hit the Import button and all the files are sucked into Aperture. There again you could use some of the import settings and save yourself some time and effort later. In the video I show you how you can set a number of things into motion, including backing up the photos as they are imported, change the files names, add keywords, put in copyright info and even alter the versions of the files with effects presets.

Aperture

Look to the right of the screen

You will see all of the option in a drop down at the top of the right side bar, it is called Import Settings. You can the Aperture app where you want to put the files by choosing a new project and naming it or choosing a project already present. Tick the box if you don't want duplicates to be imported and if you want to see the photos split into projects automatically. The photos get split by date.

I like to name files based on the syntax of Year-Month-day_hour-min-sec and this means I will always have unique names for the files. If I had two cameras taking picture at exactly the same time (which is not going to happen often) the application will add a number to the end of the filename to make it unique.

Metadata in photos

The camera will put some info in the file that is your photo. If you look you will see that the camera make and model is recorded and other details such as the lens and the settings in use for that image. When you import the photographs, why not add you name, telephone number, contact email, and your web site url. Then is someone steals your photo you will have details that prove the photo is yours and the thief can't say I didn't know how to contact you to be able to offer to pay for the use of the image.

In the previous video we looked at adding keywords to photos and I think it is better to add keywords using the HUD for that in Aperture. You can be sure of the spellings and that you will not have a confusion of having similar words that would make things harder for searching later.

Back ups of photos automatically

As the photos are put in Aperture the import settings can take care of making a back up of those photos. Set up this default setting once and you will have a level of back up in place that will keep your files safe. It is worth doing so that the photos also get sent to another disk too, or to an online storage facility.

Not just your photos in Aperture

You can add movies and also audiofiles into Aperture and this makes the app even more useful, especiallly if you are guy that works with various types of media. Good to have all your stuff looked after in one place, especially as you can use Aperture to help you find files based on the keywords, file type, length of file and with loads of terms in the metadata. Aperture is such a useful application for photographers of all types and level of professionalism.